logger offers two free publishing options for your blog: hosting on Blogspot (example.blogspot.com) and hosting on your own custom domain (www.example.com or foo.example.com). You can change your publishing option at anytime, and your content will always remain unaltered regardless of which of these options you choose.
Whether you want to purchase a new domain through Blogger or publish on a domain which you already own, we’ll walk you through the process of setting up your blog for a custom domain.
1. Buy a custom domain through Blogger.
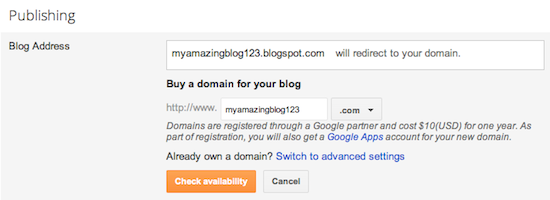
In Blogger, locate the Publishing area under the Settings tab.
 Then, click the link to add a custom domain name, enter the domain name you'd like, and click Check Availability.
This link takes you to the Google Apps domain purchase website, where you find out whether the domain you’ve chosen is available or not. If it is, go ahead and register the name, and you'll be directed to Google Checkout to make your payment (an annual fee of $10, but hosting is free!). If not, try again with a different name until you find a unique, unregistered custom domain.
You can also sign your domain up for a Google Apps account by clicking the link in the confirmation email, which you’ll receive after making your payment. You’ll get a separate email with the receipt for the domain registration.
Congratulations, you’re all set! Be patient, though -- it might take up to 24 hours for your blog to link to your custom domain. In the meantime, you'll see a transition page when you visit your custom domain.
Some helpful notes:
1. Buy a custom domain through Blogger.
In Blogger, locate the Publishing area under the Settings tab.
 Then, click the link to add a custom domain name, enter the domain name you'd like, and click Check Availability.
This link takes you to the Google Apps domain purchase website, where you find out whether the domain you’ve chosen is available or not. If it is, go ahead and register the name, and you'll be directed to Google Checkout to make your payment (an annual fee of $10, but hosting is free!). If not, try again with a different name until you find a unique, unregistered custom domain.
You can also sign your domain up for a Google Apps account by clicking the link in the confirmation email, which you’ll receive after making your payment. You’ll get a separate email with the receipt for the domain registration.
Congratulations, you’re all set! Be patient, though -- it might take up to 24 hours for your blog to link to your custom domain. In the meantime, you'll see a transition page when you visit your custom domain.
Some helpful notes:
- Your original Blogspot address will automatically forward to your new domain. That way, any existing links or bookmarks to your site will still work.
- Your posted images will continue to display on your blog.
- Find the control panel on your domain registrar’s website, and locate your DNS (Domain Name System) settings. In order to link your blog to your custom domain, follow the instructions below to enter your "CNAME" and "A-records."
CNAME
Where it says Name, simply enter "www" and list ghs.google.com as the Host Name. See our detailed instructions on providing CNAMEs for various registrars. If yours isn't listed, or if you run into other difficulties, contact your registrar directly and they can help you out.
A-records (optional)
The following action links your naked domain (example.com) to your actual site (www.example.com). If you skip this step, visitors who leave off the "www" will see an error page.
Enter your domain name in the format example.com, and list the I.P. addresses shown below in the "A" section. You'll need to create four separate A-records which point to four different Google IPs. 216.239.32.21
216.239.34.21
216.239.36.21
216.239.38.21
- Update your Blogger settings
Before you move onto this step, wait about an hour for your DNS settings to activate. If you attempt to change the publishing settings before the DNS changes activate, then we'll let you know with a warning message.
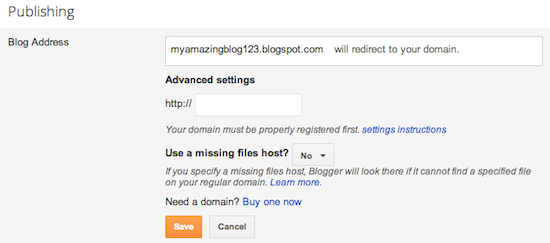
Now it’s time to make sure Blogger knows about your custom domain so that Google can direct readers to your blog. Just head back to Blogger and update the information on your Settings | Basic tab. Find the area for "Publishing," and click the link to add a custom domain.


- If your new domain isn't taking you to your blog, wait another day or two to make sure all the DNS servers have been updated. If it still isn't working, contact your registrar to make sure you entered the DNS settings correctly.
- Your original Blogspot address will automatically forward to your new domain. That way, any existing links or bookmarks to your site will still work.
- Your posted images will continue to display on your blog.
PROPERTIES FOR SALE IN OWERRI. CONTACT OWERRI PROPERTY SEARCH 07034513052
ReplyDelete